- an overview of Amazon Cognito’s Hosted UI authentication flow
- what are some of the things we need to consider, before starting with the tutorial
In order to follow this tutorial, you must use Webiny version 5.18.0 or greater.
The code that we cover in this section can also be found in our GitHub examples repository  . Also, if you’d like to see the complete and final code of the application we’re building, check out the
 full-example folder.
Authentication Flow with Amazon Cognito's Hosted UI
As mentioned in the previous section, in order to perform authentication in our application, we first need to have an authentication flow. In other words, we need to provide a way for users to sign up and sign in to our application.
An authentication flow can easily be introduced via Amazon Cognito , by creating a new User Pool . With it, we can implement a couple of different authentication flows, but for the purposes of this tutorial, we’ll go with the easiest one, and that’s Hosted UI .
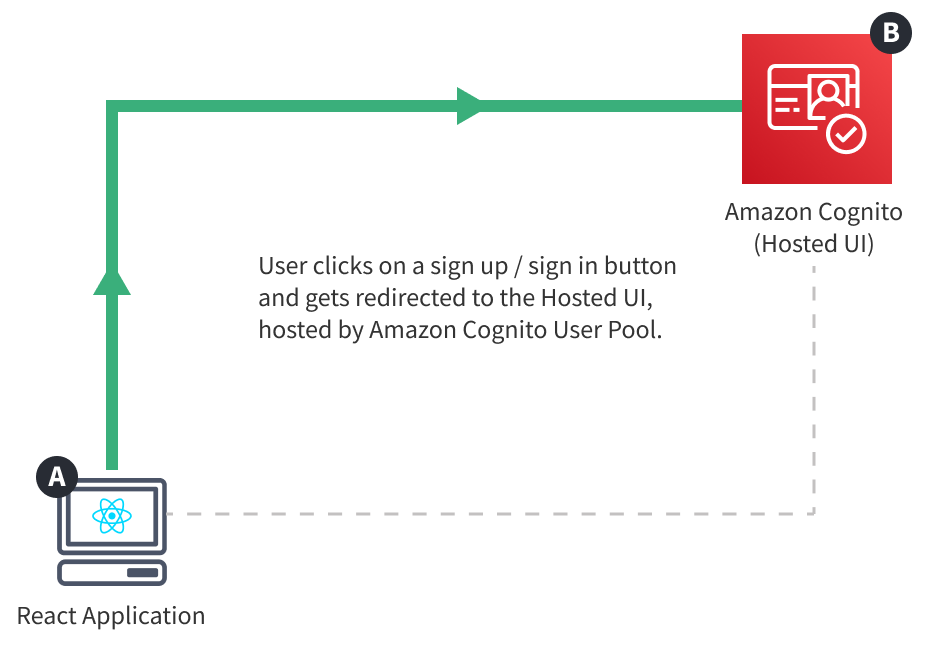
With this approach, the authentication flow is completely offloaded to Amazon Cognito. Once users wish to sign up or sign in to our application, they usually click on a button or a link, which causes a redirect to the standalone hosted authentication flow. So, as mentioned, the authentication flow is happening completely outside of our application.
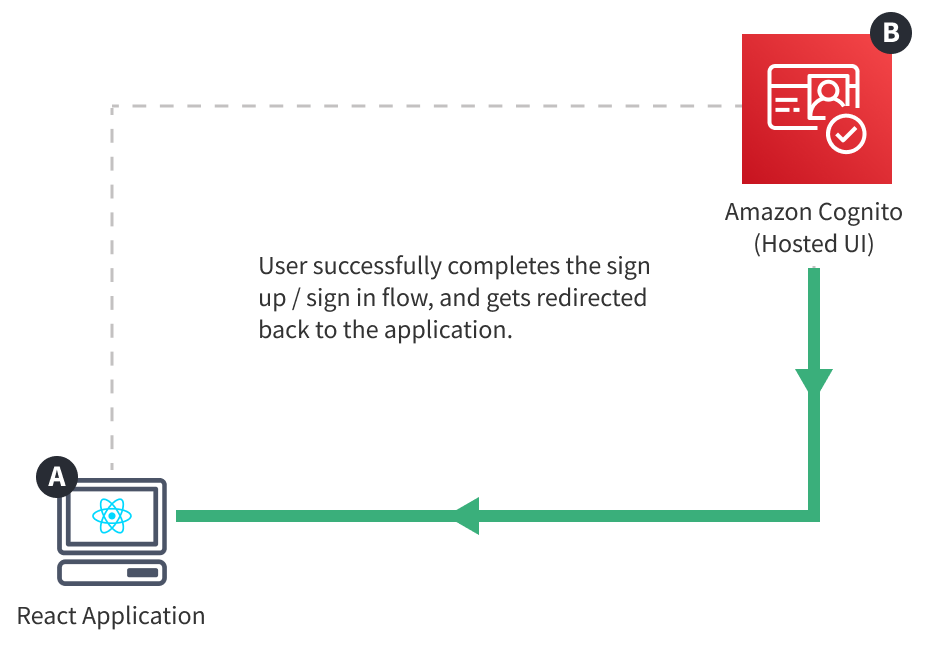
Once completed successfully, the user is redirected back to our application, but this time, authenticated. Which means we should be able to retrieve the currently signed in user within both React application and GraphQL API, ultimately enabling us to securely perform sensitive operations like sensitive GraphQL mutations, maybe even file upload, and more.
In total, in order to fully implement this flow, we’re going to need three new Amazon Cognito cloud infrastructure resources. Two deployed as part of our GraphQL API:
- Amazon Cognito User Pool - responsible for storing user data and providing an authentication flow
- Amazon Cognito User Pool Domain - provides a way to access the Hosted UI authentication flow
And, one deployed as part of our React application:
- Amazon Cognito User Pool Client - enables us to access the authentication flow from our React application and interact with Amazon Cognito HTTP API
All of these will be defined within our cloud infrastructure code, which is what we’ll start with, in the next section of this tutorial.
In the following sections, for the sake of brevity, we’ll refer to these resources without the Amazon Cognito prefix: User Pool, User Pool Domain, and User Pool Client.
Learn more about other types of authentication flows that Amazon Cognito offers, in its official documentation .
Before We Begin
dev and prod Stacks
The GraphQL API’s cloud infrastructure code, located in the pinterest-clone/api/pulumi folder, is actually organized as two separate dev and prod folders. This enables us to deploy slightly different cloud infrastructure into non-production and production environments, respectively. In this tutorial, we’ll focus on the dev folder, but note that the same changes should be applied within the prod folder as well. We certainly don’t want to end up with vital cloud infrastructure resources missing in one or the other.
Check out the GraphQL API scaffold guide for more information on differences between the dev and prod folders.
The React application’s cloud infrastructure code doesn’t follow this organization, simply because it’s not needed. Which means, there, we’ll only need to make a change once and that’s it.
webiny.config.ts Configuration File
It’s useful to know that every package in a Webiny project possesses the webiny.config.ts configuration file. For example, if we were to open our GraphQL API’s webiny.config.ts file, located in the pinterest-clone/api/code/graphql folder, we’d see the following:
const { createWatchFunction, createBuildFunction } = require("@webiny/project-utils");
module.exports = {  commands: {      watch: createWatchFunction({ cwd: __dirname }),      build: createBuildFunction({ cwd: __dirname })  }};
Essentially, the main purpose of this file is to export the needed watch and build commands, which are then internally utilized by the webiny watch and webiny deploy commands, respectively. As we can see, these can be simple one-liners, but note that we could also expand them with additional custom steps, if need be.
As another example, if we were to open our React application’s webiny.config.ts file located in the pinterest-clone/app/code folder, we’d see the following:
import invariant from "invariant";import { createWatchApp, createBuildApp } from "@webiny/project-utils";import { getStackOutput } from "@webiny/cli-plugin-deploy-pulumi/utils";
// Exports fundamental start (watch) and build commands.// Within both commands, we rely on the deployed GraphQL API (pinterest-clone/api) and its stack// output to retrieve the URL over which the GraphQL API is accessible. If needed, additional// information can be retrieved too, but remember to export it in the cloud infrastructure// code, in the following files:// - `pinterest-clone/api/pulumi/dev/index.ts`// - `pinterest-clone/api/pulumi/prod/index.ts`
const API_MAP = {  REACT_APP_API_URL: "${apiUrl}",  REACT_APP_GRAPHQL_API_URL: "${apiUrl}/graphql"};
const NO_ENV_MESSAGE = `Please specify the environment via the "--env" argument, for example: "--env dev".`;
export default {  commands: {      async watch(options) {          invariant(options.env, NO_ENV_MESSAGE);          Object.assign(              process.env,              getStackOutput({                  folder: "pinterest-clone/api",                  env: options.env,                  map: API_MAP              })          );
          // Starts the local development server at port 3002.          Object.assign(process.env, { PORT: 3002 });
          // Starts local application development.          const watch = createWatchApp({ cwd: __dirname });          await watch(options);      },      async build(options) {          invariant(options.env, NO_ENV_MESSAGE);          Object.assign(              process.env,              getStackOutput({                  folder: "pinterest-clone/api",                  env: options.env,                  map: API_MAP              })          );
          // Creates a production build of your application, ready to be deployed to          // a hosting provider of your choice, for example Amazon S3.          const build = createBuildApp({ cwd: __dirname });          await build(options);      }  }};
Here we have slightly more complex watch and build commands, but, at this point, we don’t need to concern ourselves with what’s exactly happening here. The main takeaway is that these commands can be expanded to our needs.
We’ll be revisiting these configuration files in the following sections, so we’ll be able to get an even better feeling of how these work and the role they play in our application.
In case you missed it, a Webiny project can consist of one ore more project applications, where a project application can consist of one or more packages. Learn more about the Webiny project organization in the Project Organization key topics section.
Stack Output
If we were to open the cloud infrastructure code that is initially included during the Full Stack Application scaffolding process, we may notice that at the end of each entrypoint file, for example in pinterest-clone/api/pulumi/dev/index.ts , we are returning an object that consists of a couple of properties:
return {
  region: process.env.AWS_REGION,
  apiUrl: cloudfront.getDistributionUrl(),
  graphqlApiUrl: cloudfront.getDistributionUrl("/graphql"),
  dynamoDbTable: dynamoDb.table.name,
};
It’s important to note that the returned object represents something called the cloud infrastructure stack output or just stack output, which, essentially, enables us to expose multiple values that were created during a deployment process. These may entail unique IDs of deployed cloud infrastructure resources, maybe a URL that points to a specific resource, and basically anything else that we might need.
The stack output can then be retrieved within cloud infrastructure or application code that is part of the same, or an entirely separate, project application. For example, if we were to open our React application’s webiny.config.ts configuration file, located in the pinterest-clone/app/code folder, we’d see that we’re using the getStackOutput function in order to retrieve the URL over which our GraphQL API can be accessed:
import invariant from "invariant";import { createWatchApp, createBuildApp } from "@webiny/project-utils";import { getStackOutput } from "@webiny/cli-plugin-deploy-pulumi/utils";
// Exports fundamental start (watch) and build commands.// Within both commands, we rely on the deployed GraphQL API (pinterest-clone/api) and its stack// output to retrieve the URL over which the GraphQL API is accessible. If needed, additional// information can be retrieved too, but remember to export it in the cloud infrastructure// code, in the following files:// - `pinterest-clone/api/pulumi/dev/index.ts`// - `pinterest-clone/api/pulumi/prod/index.ts`
const API_MAP = {  REACT_APP_API_URL: "${apiUrl}",  REACT_APP_GRAPHQL_API_URL: "${apiUrl}/graphql"};
const NO_ENV_MESSAGE = `Please specify the environment via the "--env" argument, for example: "--env dev".`;
export default {  commands: {      async watch(options) {          invariant(options.env, NO_ENV_MESSAGE);          Object.assign(              process.env,              getStackOutput({                  folder: "pinterest-clone/api",                  env: options.env,                  map: API_MAP              })          );
          // Starts the local development server at port 3002.          Object.assign(process.env, { PORT: 3002 });
          // Starts local application development.          const watch = createWatchApp({ cwd: __dirname });          await watch(options);      },      async build(options) {          invariant(options.env, NO_ENV_MESSAGE);          Object.assign(              process.env,              getStackOutput({                  folder: "pinterest-clone/api",                  env: options.env,                  map: API_MAP              })          );
          // Creates a production build of your application, ready to be deployed to          // a hosting provider of your choice, for example Amazon S3.          const build = createBuildApp({ cwd: __dirname });          await build(options);      }  }};
As we can see, once we’ve retrieved the stack output values, via Object.assign , we’re assigning them to the process.env object. Meaning, we’re exposing the retrieved values as environment variables, which we’ll be able to use in our React application’s code.
For now, note that in the next couple of sections, we’ll be doing a couple of updates to both the stack output and the shown webiny.config.ts configuration file. These will be needed in order to connect the deployed cloud infrastructure resources and our application together.
Stack output can also be quickly retrieved via Webiny CLI, via the webiny output command, for example:
yarn webiny output pinterest-clone/api --env dev