- how to we can transfer all of the stack output properties that we’ve added in GraphQL API and React application cloud infrastructure code, into our React application
In order to follow this tutorial, you must use Webiny version 5.18.0 or greater.
The code that we cover in this section can also be found in our GitHub examples repository  . Also, if you’d like to see the complete and final code of the application we’re building, check out the
 full-example folder.
Adjusting the webiny.config.ts Configuration File
There’s one additional step we need to complete before we can finally start working on our React application code, and that’s adjusting its webiny.config.ts configuration file, located in pinterest-clone/app/code folder. This is where we’ll finally use all of the stack output properties that we’ve added in GraphQL API and React application cloud infrastructure code, and pass them as environment variables to our React application.
In order to continue, all of the cloud infrastructure additions we did in previous two sections need to be deployed.
Changes made to the webiny.config.ts file aren’t automatically picked up by already active watch sessions, initialized with the webiny watch command. Before you start making any changes, make sure to terminate any active watch sessions you might have and run them again once the webiny.config.ts file is in the right place.
The following code highlights the changes that need to be performed:
import invariant from "invariant";import { createWatchApp, createBuildApp } from "@webiny/project-utils";import { getStackOutput } from "@webiny/cli-plugin-deploy-pulumi/utils";
// Exports fundamental start (watch) and build commands.// Within both commands, we rely on the deployed GraphQL API (pinterest-clone/api) and its stack// output to retrieve the URL over which the GraphQL API is accessible. If needed, additional// information can be retrieved too, but remember to export it in the cloud infrastructure// code, in the following files:// - `pinterest-clone/api/pulumi/dev/index.ts`// - `pinterest-clone/api/pulumi/prod/index.ts`
const API_MAP = {  REACT_APP_API_URL: "${apiUrl}",  REACT_APP_GRAPHQL_API_URL: "${apiUrl}/graphql",  REACT_APP_USER_POOL_REGION: "${region}",  REACT_APP_USER_POOL_ID: "${cognitoUserPool.id}",  REACT_APP_USER_POOL_DOMAIN: "${cognitoUserPool.domain}"};
const APP_MAP = {  REACT_APP_USER_POOL_WEB_CLIENT_ID: "${cognitoUserPool.clientId}"};
const NO_ENV_MESSAGE = `Please specify the environment via the "--env" argument, for example: "--env dev".`;
export default {  commands: {      async watch(options) {          invariant(options.env, NO_ENV_MESSAGE);          Object.assign(              process.env,              getStackOutput({                  folder: "pinterest-clone/api",                  env: options.env,                  map: API_MAP              })          );
          Object.assign(              process.env,              getStackOutput({                  folder: "pinterest-clone/app",                  env: options.env,                  map: APP_MAP,              })          );
          // Starts the local development server at port 3002.          Object.assign(process.env, { PORT: 3002 });
          // Starts local application development.          const watch = createWatchApp({ cwd: __dirname });          await watch(options);      },      async build(options) {          invariant(options.env, NO_ENV_MESSAGE);          Object.assign(              process.env,              getStackOutput({                  folder: "pinterest-clone/api",                  env: options.env,                  map: API_MAP              })          );
          Object.assign(              process.env,              getStackOutput({                  folder: "pinterest-clone/app",                  env: options.env,                  map: APP_MAP,              })          );
          // Creates a production build of your application, ready to be deployed to          // a hosting provider of your choice, for example Amazon S3.          const build = createBuildApp({ cwd: __dirname });          await build(options);      }  }};
First, we’ve updated the existing API_MAP object, which is used upon retrieving our GraphQL API’s stack output:
getStackOutput({
  folder: "pinterest-clone/api",
  env: options.env,
  map: API_MAP,
});
As the name itself suggests, the object represents a map. It is used to instruct the getStackOutput function to map the received stack output properties to new ones. This is useful because, in the watch and build commands, we’re assigning stack output properties as environment variables, which must contain the REACT_APP_ prefix in order for us to be able to access them within the actual React application code.
So, we’ve added three new properties to the API_MAP object: REACT_APP_USER_POOL_REGION, REACT_APP_USER_POOL_ID, and REACT_APP_USER_POOL_DOMAIN, which will represent the region, cognitoUserPool.id, and cognitoUserPool.domain properties included in the retrieved GraphQL API’s stack output.
We also had to add a new APP_MAP map object for the properties that will be retrieved from our React application’s stack output. This map is then used with the new getStackOutput function call, which has the pinterest-clone/app specified as the project application folder:
getStackOutput({
  folder: "pinterest-clone/app",
  env: options.env,
  map: APP_MAP,
});
Restart Watch Session
Note that, in order for the performed changes to take effect and the new environment variables to become accessible in our React application code, we’ll need to restart the watch session. So, if you had one active, in your terminal, simply stop it and start a new one, by running the webiny watch command again:
yarn webiny watch pinterest-clone/app --env dev
Note on Deploying into New Environments
Let’s say we needed to deploy our React application, in its current state, into a brand new environment.
When doing that, note that the first deployment will always need to be done twice. This is because of the order in which the React application is built and the User Pool Client is deployed.
Under the hood, essentially, the webiny deploy command performs two steps:
- compile application code and create a production build of our application
- based on the cloud infrastructure code, deploy our application and other defined resources
This means that upon deploying our React application for the first time, the getStackOutput function call, that we’ve added within the build command in our webiny.config.ts file, won’t return any results. No deployed cloud infrastructure means no stack output to read from.
So, when doing the first deployment, we recommend you first deploy your cloud infrastructure resources only, and then proceed by doing another deployment, this time with the application code. We can achieve this with the following command:
yarn webiny deploy pinterest-clone/app --env new-environment --no-build && \
yarn webiny deploy pinterest-clone/app --env new-environment
Once the first deployment has been performed, the following deployments of our React application can be done as usual, with the single webiny deploy execution:
yarn webiny deploy pinterest-clone/app --env new-environmentFinal Result
With all of the new stack output properties now being passed to our React application code as new environment variables, we’re now ready to switch to our application code and begin integrating the Hosted UI authentication flow.
FAQ
Is there a way to detect whether we're deploying our React application for the first time?
To determine whether the React application has been deployed or not, we can run the following webiny output command:
yarn webiny output pinterest-clone/app --env --jsonIf the result is different from "null", that would mean the application has been previously deployed.
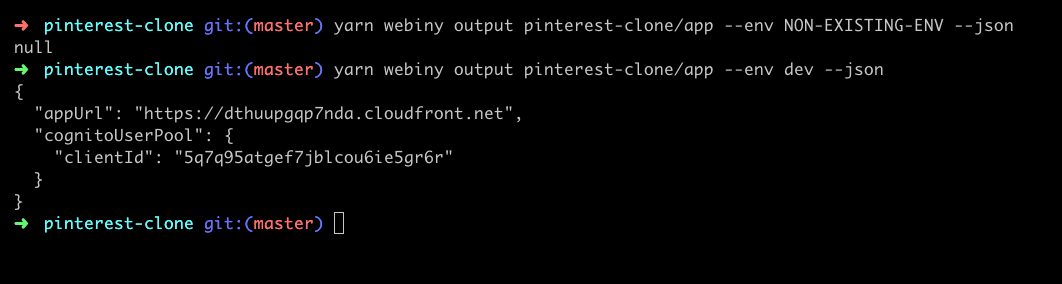
Note that the returned null is actually a string. So, in your code or a CI/CD workflow step, make sure to do a string-based comparison (=== "null").